There are three main components to consider during a bathroom installation and several smaller ones. The 3 main components are the toilet suite, the bathtub/shower, and the vanity/sink. The smaller components include the mirror, towel racks and additional storage.
1. Installing the toilet

Installing the toilet floor flange
In the majority of bathroom renovations, you will install the toilet in same space where the previous model was removed from. Utilising the same space and the existing plumbing connections makes the task considerably easier. Installing a toilet in a new location will require rerouting the plumbing and is a much more complex project, so most bathroom-renovators avoid doing this.
Start by installing a new floor flange
Make sure the new toilet it is level with the finished floor. If new flooring has not been installed yet, place a piece in under the toilet to ensure that it will be level. Use plumbing silicone sealant to set the new floor bolts. Set the new toilet bowl on its side and place the wax gasket over the horn. Next, apply the silicone sealant all around the edge of the toilet. Line the toilet up with the floor bolts as you move it into place, and use your body weight to ensure it is firmly in place. The wax ring needs to make good contact with the flange; you should feel it pressing into place.
Sometimes the wax ring needs to be warmed to be pliable – you can set it out in the sun or a warm place next to an indoor lamp for a while if necessary. Verify that the toilet is level and also square with the wall before you tighten down the nuts and washers.
Install the tank after the bowl is in place
Start by placing the rubber tank cushion if included and then installing the gasket on the flush valve opening. Mount the tank onto the bowl and secure the washers and nuts. Use silicone sealant to add decorative covers for the bolts and also around the base of the toilet. Attach the flexible tubing to the back of the tank and to the supply line in the wall and make sure it is sealed. Finally, install the toilet seat with the included bolts. Next, turn on the water. Allow the toilet’s tank to fill up and perform your first flush test; consider adding a few drops of food colouring to the tank prior to the first flush so that you can check for any leaks.
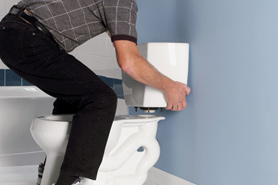

Toilet bowl installation
2. Installing the bathtub and shower
Before you start your bathroom installation, make certain that all of the piping is in place and ready to go. Lower the bathtub onto the support studs (be sure that you have strong support for your bathtub) with the flange in place against the wall. Connect the bathtub overflow to the drain; be certain that you do this above the trap. Connect the hot and cold water lines onto the ports of the mixing valve, and then run the shower pipe up the wall. Extend the pipe for the tap in accordance with the manufacturer’s directions. Before moving forward, turn on the water and check for any sign of leaks.
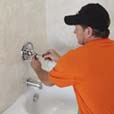

Bathtub installation
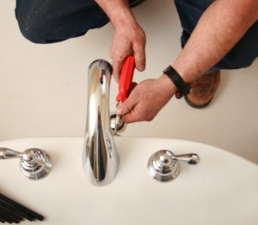
At this point you will install either a bathtub surround or a waterproof wall around the length of the bathtub’s dimensions. Use caulking to seal the edges of the bathtub where it meets the wall or bathtub surround and in any other joints of the bathtub surround pieces. Finish the job by installing the tap, shower head and handles, according to the manufacturer’s directions.
If you are installing a separate shower or even a shower stall alone, you will install it in much the same way but without the bathtub itself. You can skip the shower head steps for a separate shower or a bathtub alone. A stand alone shower stall will require only the shower head installation.
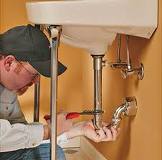
3. Installing the vanity and sink
Before installing, take measurements of the vanity and mark on the wall where it will fit into place. Be sure the pipes will line up properly. Measure and then cut the holes in the back of the vanity carefully. Move the vanity into place, lining it up with your markings on the wall. Check to ensure it is level before anchoring it to the wall.
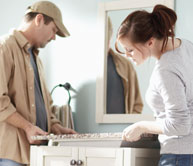
Installing a vanity and sink
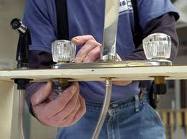
During the third part of the bathroom installation you will install the vanity top and sink. If the sink is molded into the top you will have to install the tap first. Screw the tap piece into place and attach flexible piping. Then apply caulking around the edges and press the entire top into place. If the sink is installed separately, first install the top and then carefully insert the sink and tap. Finish the job by using caulking to seal the edges.
Connect the drain pipe and the flexible tubing to the water supply and then turn on the water and check for any leaks.
Putting the final touches in place.
Finally, you will hang your mirror – carefully and securely following any guidelines issued by the manufacturer. Attach the towel racks and a toilet paper holder to the walls in your preferred locations. Install the shower curtain rod above the bathtub if one is needed. To prevent water from hitting the floor, measuring to be certain that it will hang at the right length.
When you have completed all of the bathroom installation, double check that there are no visible leaks in any of the newly installed plumbing; if you have checked at each point along the way, there should be no problem.
Follow all of the manufacturer’s directions as you work on your bathroom installation project as there may be instructions specific to that model. This will save you from the need to do things over again if they were done incorrectly in the first place. A DIY bathroom installation project can be a lot of work, but in the end you will have a beautiful new bathroom that you can be proud of.
Links
For Bathroom Installation equiptment and advice try Eagles Plumbing
Find more Bathroom related articles on the HD2 Site.